With the generic order import, customers can transmit their order in an XML, which is read into the ingenious database via script and created as an order.
The settings for the document import are saved in the customer's contact record.
The file storage and the XML structure can be defined individually for each customer.

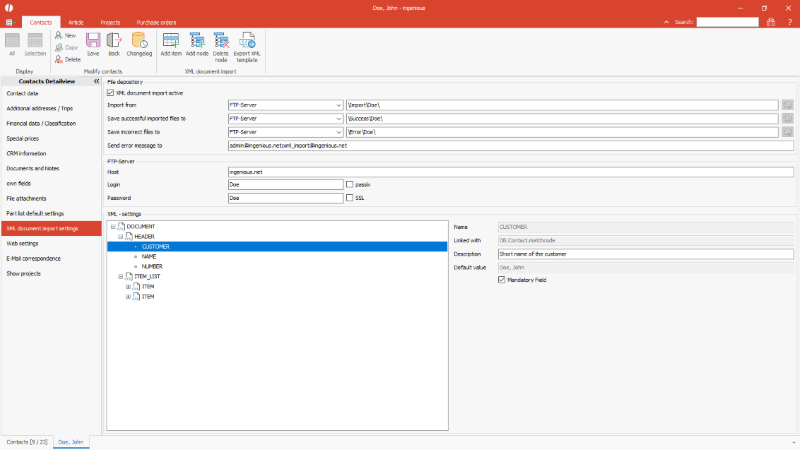
Configuration of the document XML import for a contact |
Functions
The following functions are available via the icon bar for the settings of the XML document import:
| Inserts an article with its preconfiguration into the XML structure. | |
| Adds a new node. | |
| Deletes the selected node. (Nodes that are the minimum required for the structure cannot be removed.) | |
| Exports the XML template for forwarding to the customer. The Windows save dialog opens, in which the storage location can be selected and the filter name can be assigned. |
File storage
| XML document import active | Checkbox | Determination of whether the customer is connected to the order import. |
| Import from | Selection list + simple input field |
Selection of whether the import is to take place from a local or network directory or from an FTP server + specification of the storage path. |
| Save successful imported files to | Selection list + simple input field | Selection of whether successfully imported files are to be saved in a local or network directory or on an FTP server + specification of the storage path. For storage in the local or network directory structure, the corresponding folder can be selected using the folder symbol. The FTP folder is specified without specifying the FTP host. |
| Save incorrect files to | Selection list + simple input field | Selection of whether faulty files should be stored in a local or network directory or on an FTP server + specification of the storage path. For storage in the local or network directory structure, the corresponding folder can be selected using the folder symbol. The FTP folder is specified without specifying the FTP host. |
| Send error messages to | Simple input field | Enter the recipient e-mail address(es) to which a message should be sent in the case of an error. Enter several e-mail addresses separated by a semicolon. |
FTP-Server
| Host | Simple input field | Address of the host of the FTP server without a leading ftp. or ftp:// |
| Login | Simple input field | Login for the customer to access the FTP server |
| Passwort | Simple input field | Password for the customer to access the FTP server |
| passiv |
Checkbox |
Setting whether the FTP access should take place via the passive mode |
| SSL | Checkbox | Setting whether communication should take place via encrypted protocol (SSL) |
XML settings
The structure of the XML file is specified in the XML settings.
For each new customer configuration, the basic structure is loaded, which consists of the header and the item list.
For each node name, the link to the database field or partlist variable an optional individual description, a possible default value and the identifier for a mandatory field are given.
Structure of the header
The header data of the order document are specified in the header.
Standard node
The standard nodes represent the minimum configuration of the XML structure.
These must be included in the XML supplied by the customer.
Standard nodes cannot be deleted.
| Node | Field link | Default value | Description |
| CUSTOMER | DB.Contact.Matchcode | pre-assigned with the customer's matchcode, cannot be change | Information about the customer to assign the order |
| NAME | DB.Project.document_name | Specification of a default value for the name of the document with which the job is to be imported | The project document name under which the order documents are to be imported is specified here. If the name matches a project document defined in the program settings, the counter is generated from this configuration. Must be a document of the type order confirmation = status 1. |
| NUMBER | DB.Project.no_of_subsidiary_project | Angabe eines Standardwertes für die Projekt Kommission(snummer), mit der der Auftrag importiert werden soll | Specification of a customer-specific order / purchase order number or commission description that is tranferred to the project field "project"; the internal document number is assigned automatically. |
Additional nodes
Additional nodes can be added to the header using the button ![]() .
.
With the node <DELIVERY_DATE> with the link a the project field, e.g. date_9, the customer can submit a requested delivery date, for example.
Structure of the item list
All items of an order are listed in the item list <ITEM_LIST>.
A node <ITEM> is written for each position, which contains the following standard elements:
| Node | Field link | Default value | Description |
| ITEM-ID | DB.Item.number | If an article was explicitly configured for the XML order import, its article number is automatically entered here. | Internal article number of the position |
| ITEM-NAME | DB.Item.matchcode | If an article was explicitly configured for the XML order import, its article matchcode is automatically entered here. | Internal matchcode of the item |
| QUANTITY | DB.Project_item.quantity | e.g. 1 or higher if a minimum number has to be ordered | Quantity in which the article is ordered |
| X | DB.Project_item.x | e.g. 100 or higher if a minimum length has to be ordered | Length in which the article is ordered, or width for flat articles, as far as applicable to the respective article, according to the input unit of measurement configured in the program settings (cm, mm, inch) |
| Y | DB.Project_item.y | e.g. 100 or higher if a minimum width has to be ordered | Height at which the article is ordered, as far as applicable to the respective article, according to the input unit measurement configured in the program settings (cm, mm, inch) |
| Z | DB.Project_item.z | e.g. 100 or higher if a minimum depth has to be ordered | Depth at which the article is ordered, as far as applicable to the respective article, according to the input unit measurement configured in the program settings (cm, mm, inch) |
For each article to be ordered, all properties must be defined with which it can clearly identified or produced.
For products that are manufactured from several individual parts, in formation about the desired design must also be provided.
All variants of a complex product are defined in the so-called partlists.
For each property a variable is defined which can contain different values.
All the necessary variables for such an article must be listed in the XML structure.
Partlist configuration
The desired part list can be loaded via the item search using the button ![]() .
.
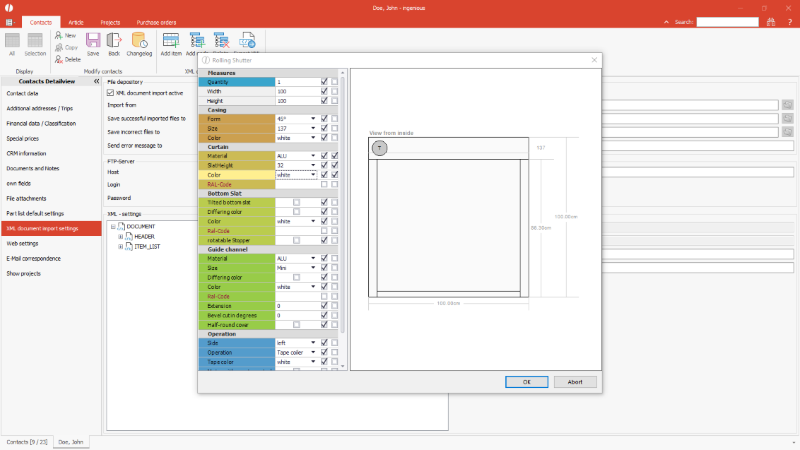
The checklist opens in which it is determined which options should be included in the XML (1st checkbox) and which option must be filled in (2nd checkbox).
In addition a standard configuration can already be set.
If no values are entered for individual options in the XML transmitted by the customer, the standard value is accepted (e.g. the customer always orders a certain profile type or color).

Configuration of a partlist for the XML order import of a customer |
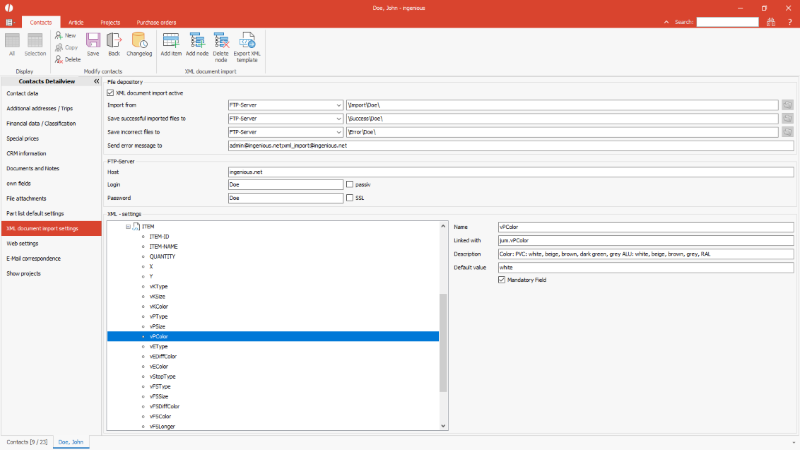
All parameters of a partlist are loaded into the XML structure according to the previous configuration.
The details of the individual nodes can then be edited further.
For example, the possible values of a parameter can be specified in the description for information for the customer.

Item node of a partlist |
A part list can also be preconfigured in the article data and is then available for all customer configurations when the article is added.
see Sourcecode View and Measurement
Transfer of the XML
Once the XML structure has been defined, a template for the customer can be exported using the button ![]() .
.
With the help of this template the customer can (let) program an export of his order for his software.
| XML template |
Copy Code |
|---|---|
<?xml version="1.0" encoding="UTF-8"?> <DOCUMENT mandatory="true"> <HEADER mandatory="true"> <CUSTOMER mandatory="true" description="Short name of the customer">Doe, John</CUSTOMER> <NAME mandatory="true" description="Name of the document">Order confirmation</NAME> <NUMBER mandatory="true" description="Project or own purchase order number"/> <DELIVERY_DATE description="Desired delivery date"/> </HEADER> <ITEM_LIST mandatory="true"> <ITEM> <ITEM-ID mandatory="true"/> <ITEM-NAME mandatory="true"/> <QUANTITY mandatory="true">1</QUANTITY> <X>100</X> <Y>100</Y> <Z>100</Z> </ITEM> <ITEM> <ITEM-ID mandatory="true">RS</ITEM-ID> <ITEM-NAME mandatory="true">Rolling Shutter</ITEM-NAME> <QUANTITY mandatory="true">1</QUANTITY> <X mandatory="true">100</X> <Y mandatory="true">100</Y> <vKType>45°</vKType> <vKSize>137</vKSize> <vKColor>white</vKColor> <vPType mandatory="true">ALU</vPType> <vPSize mandatory="true">32</vPSize> <vPColor mandatory="true" description="Color: PVC: white, beige, brown, dark green, grey ALU: white, beige, brown, grey, RAL">white</vPColor> <vEType>False</vEType> <vEDiffColor>False</vEDiffColor> <vEColor>white</vEColor> <vStopType>False</vStopType> <vFSType>ALU</vFSType> <vFSSize>Mini</vFSSize> <vFSDiffColor>False</vFSDiffColor> <vFSColor>white</vFSColor> <vFSLonger>0</vFSLonger> <vFSBevel>0</vFSBevel> <vFSCover>False</vFSCover> <vControlSide>left</vControlSide> <vControlType>Tape coiler</vControlType> <vControlColor>white</vControlColor> </ITEM> </ITEM_LIST> </DOCUMENT> | |
Import of the order data
The import of the order data itself is executed time-controlled by the scheduler.
To do this, a script is to be created with the following call:
| XML_Import |
Copy Code |
|---|---|
public void XML_Import(out bool bError, out string sResult, out string sDescription) { bError = false; sResult = ""; sDescription = ""; ingenious.net.Moduls.ProjectXmlImport.Import.Start(out bError, out sResult, out sDescription); } | |
In the scheduler this script is then selected in the general task planning as the method to be executed.